Showing posts with label http. Show all posts

Tuesday, August 26, 2008

Building a RESTful Enterprise Integration with Oracle and SnapLogic

In the enterprise space, integration problems abound.  IT must connect numerous legacy systems in new applications to adjust to the changing needs of the business. Technologies to achieve such integrations include SOAP based Web Services (WS-*) and binary protocols such as CORBA and RMI. This blog entry discusses a different approach - integration using lightweight REST APIs.

To illustrate the concept, a demo has been created showing how to combine data from Oracle's WebLogic Portal product with data from Oracle Database. This demo is accomplished using RESTful APIs as the data transport mechanism, and is orchestrated by a third party data integration product called SnapLogic. This demo was showcased at a REST Symposium I organized for Oracle employees in July, which featured speakers from Oracle, SnapLogic and Yahoo! (see below for details).


What is REST?

REST is an acronym for REpresentational State Transfer, and was coined by Roy Fielding in his PhD thesis published in 2000. It is not a technology, a standard, or a product. REST is an architectural pattern that describes the underlying architecture of the World Wide Web and how it came to be such a massively scalable computer application. The WWW is known to have the following qualities:

  • Highly scalable - millions of websites
  • Fault tolerant - at any given time, many websites are offline, but the web continues to work
  • Performance- HTTP allows for intermediaries to help improve performance via caching
  • Interoperable - nearly every computing platform has a browser, and websites are written in a myriad of languages
  • Distributed - websites and clients span the globe
  • Self describing - there is no user manual required for users to navigate the WWW

Aren't the above qualities desired for any enterprise systems as well? The power of REST lies in the idea that the same fundamentals that work so well for the WWW can also work with great success within the enterprise. 

There are plenty of resources on the web that explain the principles of REST, and so I have no intention of duplicating that material. In essence REST describes an architecture in which:

  • Application resources (objects, in the OO world) are exposed as URIs
  • HTTP requests are used to retrieve and update data on the server
  • The HTTP requests utilize the standard HTTP verbs (GET, POST, PUT, DELETE) to define the API operations, helping client developers by providing a consistent interaction model

An example is the following:

  • A client issues a request to the following URI:  http://wlp.bea.com/dvt/api/content/autos.jsp
  • The server response contains a list of automobiles, described in a format such as XML
  • The client consumes the XML document and outputs the entries that match the user's criteria

This pattern is seen most often with Rich Internet Applications (RIA), where the client is a browser and the API is being invoked via Ajax (more precisely, the JavaScript XmlHttpRequest facility). While this is a very powerful use of RESTful APIs and is alone enough to justify the creation of RESTful APIs, this use case is not the focus of this blog entry. I would encourage you to research Ajax application development for more background.

Instead, we will look more closely at how RESTful APIs can also make data integration easy.


RESTful Integration in Concept

RESTful APIs expose data in a way that is easily consumed. Invoking the API is as easy as issuing an HTTP request, which is possible to do from almost any programming language/platform. While enterprise data integration can be implemented using a wide variety of technologies, the purpose of this blog entry is to show how it can be done with RESTful APIs.

As stated in the preamble, there are non-RESTful approaches to solving this problem. A SOAP based solution could be implemented and for some cases is the preferred approach. If your use case requires the support of the WS-* family of standards, then WS-* is the way to go. What this example shows is that REST offers an alternative and is appealing in its simplicity.

Instead of discussing the theory, it is more useful to look at a working example.

Example: Oracle WebLogic Portal + Oracle Database + SnapLogic + REST

Consider the following example:

  • An insurance company is using the Content Management capabilities of Oracle WebLogic Portal to store auto claims. Each claim contains a photo of the damaged vehicle, and some data about that vehicle such as make, model, year and a description of the damage.
  • The insurance company also has a Oracle Database that is populated with industry data regarding the fair market value of the cars, and the salvage value. These values are specific to the make, model and year.
  • The insurance company wishes to put the repair of the damaged vehicles out to bid to a community of auto repair shops. The intent is to allow shops to bid on the vehicles they are willing to repair using the industry data and the information from the claim.

The insurance company decides to use a quick and lightweight approach to build a data mashup with a web UI. The implementation is achieved using RESTful APIs, and orchestrated using a product called SnapLogic. SnapLogic is an open source server that provides:

  • Many pre-built connectors to expose native data sources as RESTful APIs (e.g. database, spreadsheet, XML)
  • Sophisticated data manipulation capabilities, such as joins, filtering, sorting, and computations
  • A variety of output formats for the completed RESTful feed

The data integration demo was implemented as follows:

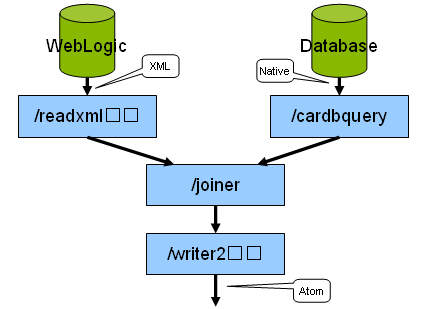
  • A RESTful API is configured for the WebLogic Portal (WLP) Content Management system. In this example, the RESTful API was custom built as a JSP, but this capability will come pre-built in a future version of WLP.
  • The Oracle Database schema is exposed as a RESTful data API using an out of the box Database Reader component of the SnapLogic server.
  • The two data sources are joined using a SnapLogic pipeline. The pipeline reads the claims from WLP CM and the industry data from the database using the RESTful APIs.
  • The joined data is converted into an ATOM syndication feed via the SnapLogic server (using an Xml Writer component)
  • The ATOM feed is displayed in a ATOM reader, in this case the Google Mashup Editor UI

All of this is achieved via configuration, not code. The architecture is depicted in this diagram:
image

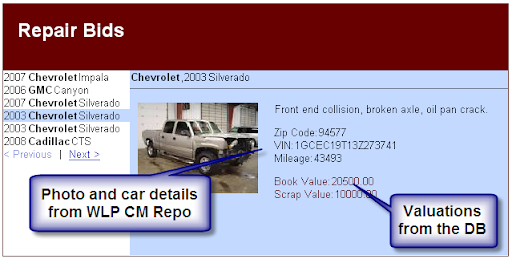
The resulting web application appears like this:
image

For more detailed information on the implementation of this mashup, consult the companion entry on SnapLogic's blog:

Oracle and REST

This is a simple demonstration that shows the ease of implementing integrations using RESTful techniques, especially when combined with a REST integration enabler such as SnapLogic. It is a stated goal of some of the Oracle product groups to provide RESTful APIs for access to product data. Check with the roadmap for each product to understand when these APIs will be available.

Attendees to Oracle Open World 2008 will have several sessions related to Oracle product groups and REST:

Oracle Internal REST Symposium

For Oracle employees, more information is available on the company intranet. I organized an internal symposium on REST amongst the product groups on July 28th, 2008. The event included speakers from Yahoo! and SnapLogic.

eventLogo

The agenda covered a number of RESTful topics, including:

  • Explaining REST (Subbu Allamaraju of Yahoo!)
  • Industry product landscape - SnapLogic (Mike Pittaro, CTO SnapLogic), and other products
  • Enabling technologies - RESTlet, JSR 311, WADL, JSON marshalling
  • Oracle Product efforts - presentations by various products groups on their REST efforts

Access to the recordings and slide decks can be found on the intranet here.

Resources

You may find the following links helpful:

Tuesday, April 22, 2008

Introduction to Google Gadgets

We have been showing how to expose WebLogic Portal portlets as Google Gadgets for almost two years now. Embarrassingly enough, we haven't written any blogs or articles on HOW to do it. We have answered email questions about it, but nothing public. This two part blog series will correct that omission. You will hopefully see that it is really quite simple to do. This first entry will talk about building a generic Google Gadget (without WLP), and then the following entry will show how to convert any WLP portlet into a gadget.

NOTE: this blog entry was originally posted April 22nd, 2008 on my previous blogging system (dev2dev.bea.com).

What are Google Gadgets, and iGoogle, please?

Google Gadgets are web based widgets/portlets/[insert your favorite web component term here] that are based on technology provided by Google specifically to make federating gadgets easy. To see gadgets in action, the best place to try them out is on the iGoogle portal.

Gadgets can really do anything. This example shows an eBay integrated gadget that allows a user to interact with their eBay account within the gadget:

image

The technology provided by Google can be lumped into these buckets

  • An xml file format for describing a gadget (called the descriptor)
  • A gadget preferences model - for storing user specific preferences for a gadget external to the gadget implementation
  • Various JavaScript libraries for doing useful things
  • An online directory of pre-built gadgets
  • iGoogle - the reference platform for users to use gadgets
  • Google Gadgets for your Webpage - a JavaScript mechanism for including a gadget on ANY web page

Several things are notably missing from what Google provides with regard to gadgets

  • Gadget hosting - aside from a few official Google gadgets, all the gadgets are hosted independently by their creators
  • Gadget validation - treat every gadget with suspicion; even though it is flying the colors of a well known brand it may be hosted by a guy in a basement.
  • Authentication - there is no provided mechanism for gadgets to inherit authentication from the consuming page, notably no single sign on with iGoogle

Finally, note that there is another gadget technology offered by Google called Desktop Gadgets. There gadgets are targeted toward Google Desktop, and aren't related to the gadgets we are discussing.

The Google Gadget Phenomenon - why should you even care?

Google Gadgets and iGoogle were the fastest growing product offered by Google in 2006 and had strong growth again in 2007

“The star performer for [2007] was Google’s personalized start page service iGoogle which increased traffic in the 12 months to November by 267.64%.” (TechCrunch)

Useful Gadgets get heavily used:

“The Google gadget ecosystem received 960 million pageviews last week” (Niall Kennedy)

These metrics are largely based on use of gadgets and iGoogle in the consumer space. But consider how your enterprise can benefit from deploying Google Gadgets:

  • A new channel to your customers within iGoogle
  • Offered as a widget to your customers to place on their own web pages
  • A new channel to your partners/employees within iGoogle

Building a Simple Google Gadget - as easy as falling off a bike?

This section discusses the express route to building a gadget. Steps to build:

  1. Create a gadget implementation, which is nothing more than an HTML document served from a public web server.
  2. Create a gadget XML descriptor, that refers to the gadget implementation.
  3. Add the gadget to iGoogle.

Step 1: Create the Gadget Implementation

Save this HTML into a file on a public web server.

<html>

<body>

Hello World.

</body>

</html>

Step 2: Create the Gadget Descriptor

Save this XML into a file on a public web server (I have also hosted one publicly here for now: http://wlp.bea.com/blogs/simplestGadget.xml). You will need to update the href included in the body to the URL to your HTML document created by step 1.

<?xml version="1.0" encoding="UTF-8" ?>

<Module>

<ModulePrefs

title="Simplest Gadget"

directory_title="Simplest Gadget"

title_url="http://wlp.bea.com"

description="Very very simple gadget."

height="120"

author="Peter Laird"

/>

<Content href="http://wlp.bea.com/blogs/simplest.html" type="url" />

</Module>

Step 3: Add the gadget to iGoogle

Login to iGoogle, and then click the Add Stuff link, and then Add Feed or Gadget link. Provide the URL to the XML document created in step 2.

image

Step 4: Enjoy!

image 

Next Steps

In the next blog post, I will show how to expose any WLP portlet as a Google Gadget. Stay tuned!

References

I only covered a small part of the Google Gadget technology. Their developer documentation is excellent, so please refer to it for more details:

Technorati Tags: ,

Thursday, July 5, 2007

Building a Greasemonkey Mashup Tutorial

Ever wonder what a mashup between Tim O'Reilly (technology guru) and Alfred Chuang (BEA CEO) would look like? Well, that might not be pretty but a mashup between O'Reilly Safari and BEA dev2dev holds more promise. What's not to like: embed a world class online technical library (Safari) into a world class enterprise developer web site (dev2dev). Sounds like a winner. Let me show how this easily done with the browser based mashup tool called Greasemonkey.

NOTE: this blog entry was originally posted July 5th, 2007 on my previous blogging system (dev2dev.bea.com). Comments on the old blog were not transferred.

This is part 2 of a series of blog entries on Greasemonkey mashups.

The Magic of Greasemonkey

As I demonstrated in my last blog entry, it is very easy to meddle with any web site you visit on the web. The tool that makes this possible is Greasemonkey, a project started by Aaron Boodman, which enables you to inject, modify or delete pieces of a web page. And all of this is done client-side in the Firefox browser. As an example, in my previous blog entry I showed how easy it is to add a new link to the dev2dev web site. For that case, the Greasemonkey script simply found the right injection point in the page, and then blasted in a new link into that spot.

If you read Mark Pilgrim's Dive Into Greasemonkey online manual or his Greasemonkey Hacks book, you will find all sorts of things to do with an HTML document. You can slice and dice a page anyway you want. For example, one scripter wrote the Ad Blocker user script that deletes ads magically from any page. Also, writing Greasemonkey scripts for GMail seems to have become a cottage industry.

If you stretch the term mashup, you can even call the results of these activities mashups. The target web site is being mashed up with the Greasemonkey user script. But how about creating a more definitive mashup - can the script inject elements from a second site into that target web site? Once again, this is easily done in Greasemonkey and this blog will show you how.

O'Reilly Safari + BEA dev2dev

As mentioned in the preamble, the mashup will target BEA's dev2dev website like in my previous blog entry. However, in this tutorial, I will show you how to inject dynamic content from another site: O'Reilly's book catalog. The idea is this: as you read blogs and articles on BEA dev2dev about web technologies (JSON, Ajax, JavaScript, Greasemonkey, etc), it would be nice to have a list of embedded links to O'Reilly's book catalog. This will be helpful if you wish to find a book to learn more about the technology you are seeing in the blog or article. Further, this list will include links to the O'Reilly Safari online library, giving you instant access to in-depth books and papers on that topic. Safari eliminates the need to order an O'Reilly book via mail - almost the entire O'Reilly catalog is conveniently available for reading online.

BEA dev2dev does not currently have this O'Reilly feature, but that is not a problem. I will build a mashup in this blog entry using Greasemonkey to create this feature.

Let's get started...

Building a Web Mashup with Greasemonkey

I will assume you have read my previous blog entry and that you understand:

  • What Greasemonkey is, and how it performs it's magic in the Firefox browser without modifying the target site
  • How to inject HTML into a location on a web page
  • A basic familiarity with a programming language like Java, JavaScript, etc

Additionally, you need to understand in essence what the XmlHttpRequest is, which I will cover immediately. The XmlHttpRequest is the heart and soul behind that Ajax buzzword you probably have heard something about. It allows the browser to issue HTTP requests programmatically from JavaScript. The XmlHttpRequest quietly operates behind the scenes on a page to gather information from a web server. This feature is used along with code to modify the current page (called DOM manipulation) to update small pieces of the page without causing a full page refresh. This is Ajax. There are detailed articles on the subject like this one from David Teare on dev2dev if you would like to learn more.

To build the O'Reilly Safari + BEA dev2dev mashup, the XmlHttpRequest will be the cornerstone of the solution. When the user browses to a blog or article on dev2dev, the Greasemonkey script will issue an XmlHttpRequest to the O'Reilly web site to gather a list of books that are relevent. It will pass the title of the blog or article as the search query, and it will specify that only 3 books are wanted in the result set. Once the response is received, the Greasemonkey script will extract the summaries of those 3 books and inject that list into the blog or article.

As a starting point, look at this mashup tutorial article of mine on dev2dev: Mashup Article. Now, see the image below to see the end result of this mashup with the O'Reilly links injected:

greasemonkey_oreilly_injected.png

What about the Single Origin Policy?

If you have read about mashups in general or the XmlHttpRequest specifically you will perhaps see a problem with the plan I outlined above. Browsers have universally implemented a security policy that affects the XmlHttpRequest. This policy is called the Single Origin Policy (SOP), and is designed to prevent Cross-Site-Scripting (XSS) attacks. The details of XSS aren't important here, but the SOP is. The SOP prevents an XmlHttpRequest from targeting a URI from a network domain different from the parent page. For example, if a user types http://dev2dev.bea.com in the address bar of his browser, an XmlHttpRequest triggered from that page cannot target http://hack.evil.com. The SOP limits the XmlHttpRequest to the bea.com domain. This is security and this is good.

So how about my plan to implement this mashup? If the user targets a blog or article on dev2dev.bea.com, how is it possible to send an XmlHttpRequest to an O'Reilly web property? The answer is that Greasemonkey scripts operate at a higher privilege level than ordinary page JavaScript. The SOP does not apply to XmlHttpRequests driven from Greasemonkey scripts. So we are clear for take off with this mashup implementation!

greasemonkey_oreilly_arch.png

Building the Script

I will once again assume you have read my previous blog entry and understand how Greasemonkey can inject HTML into a page. What I will show here is how to issue an XmlHttpRequest to a website from a Greasemonkey script and how to process the results to extract the required information. That information will then be injected into the dev2dev blog or article using the technique already covered. The full script is publicly available on the Greasemonkey script repository here: dev2dev Oreilly Script. I encourage you to look at the full script, install it, and use it when visiting dev2dev in the future.

What follows is the partial script listing. It shows these elements:

  • Constructs the URI - sets a parameter to constrain the query to 3 results, and sets the blog/article title as the book query
  • Invokes the XmlHttpRequest to the URI, passing a callback function to invoke when the response is received
  • The callback function parses the response and injects the list of books into the page
// SNIP - code removed for brevity.
// The full script finds the right place in the DOM
// to inject the O'Reilly results

if (commentsAnchor)
{
// build our not-quite-REST URL, not oreilly.com but
// nevertheless it is the O'Reilly book query.
// Note: passing blog title as the query string
var oreillyUrl =
'http://search.atomz.com/search/?sp-a=sp1000a5a9'+
'&sp-t=store&sp-x-1=cat&sp-x-2=cat2&sp-q-2=Books'+
'&sp-c=3&sp-q='+
document.title;
GM_log('URL: '+oreillyUrl);

var user_agent = 'Mozilla/4.0 Greasemonkey';

// go ask Tim what he would recommend based on the
// blog/article title
GM_XmlHttpRequest({
method: 'GET',
url: oreillyUrl,
headers: {
'User-agent': user_agent,
'Accept': 'text/html',
},
onload: processOreillyResponse
});
}
else {
GM_log(' Error: did not find a comment anchor');
}

// callback from the XmlHttpRequest with response
function processOreillyResponse(responseDetails)
{
oreillyHTML = responseDetails.responseText;

// we want to find this HTML in the response since
// it delineates the list of books:
/*
<!-- ResultListStart -->
blah blah
<!-- ResultListEnd -->
*/
var start = oreillyHTML.indexOf(
"<!-- ResultListStart");
var end = oreillyHTML.indexOf(
"<!-- ResultListEnd -->", start);
GM_log("Clipping start: "+start+" end: "+end);
var result = oreillyHTML.substring(start, end-1);

if (result)
{
oreillyHTML = result;

// create the HTML element containing the list
resultsElement = document.createElement(
"placeholder");
resultsElement.innerHTML = oreillyHTML;

// inject the list into the page
commentsAnchor.parentNode.insertBefore(
resultsElement, commentsAnchor);
}
else {
GM_log("Nothing was returned from the clipping");
}
}


Once this script is installed into Firefox, Greasemonkey will properly inject O'Reilly book results into dev2dev pages. Furthermore, the results returned from O'Reilly are conveniently marked up with links to the traditional book catalog, and also to Safari. So with a single click from the blog or article, you can navigate to Safari and dive into a full length book on the technology you just read about on dev2dev. Nice!


Next: Is Greasemonkey a Good Mashup Solution in the Enterprise


If you have been following my blog you will know that I like to evaluate how to use various mashup technologies in the enterprise. I do have an opinion in this regard with Greasemonkey, but it's more than a few paragraphs worth of material. I will delay diving into this topic until my next post. Actually I am debating how to cover it - I may stretch this discussion across the next 3 blog posts, or perhaps I will blast it all in just one. We need to look at various issues such as versioning, Greasemonkey's inverted security model, and Greasemonkey's mashup sweet spot. Subscribe to my blog feed and you'll be sure to catch the discussion however I package it.


Further Reading:


Monday, June 4, 2007

BEA WebLogic + Microsoft Popfly = Enterprise Mashups

In my last blog entry, I showed how to build a data driven Mashup using Microsoft Popfly. That exercise was a stepping stone to this blog entry: I will show how WebLogic Portal can surface enterprise data into a Popfly Mashup. In particular, I will show how images located in a WebLogic Portal Content Management repository can be brought into a Popfly project. This demo shows how BEA products can be the key ingredient in your enterprise mashup projects.

NOTE: this blog entry was originally posted June 4th, 2007 on my previous blogging system (dev2dev.bea.com). Comments on the old blog were not transferred.

NOTE: as of 2009, Microsoft has announced that it is terminating support for Popfly.

Building a Mashup with Microsoft Popfly

My last blog entry covered Microsoft Popfly, which is a new mashup building tool from Microsoft. Instead of covering that topic again, I will simply point you to that blog entry if you need some more context.

Reference: previous blog entry

Enter BEA WebLogic Portal and Enterprise Mashups

We have been showing customers how WebLogic Portal can be a key component in your enterprise mashup project. You have hopefully seen how WLP can consume Google Gadgets and other external services to create portal based mashups. WLP can also work in reverse - WLP can produce its portlets onto other, non-portal web pages and mashups like iGoogle. For a quick recap of these capabilities please consult these resources:

  • Webinar: Enterprise Mashups with WebLogic Portal 9.2 - I presented an introduction to the Enterprise Mashup space
  • WebLogic Portlet Publishing - an article discussing how WLP portlets can be produced onto non-portal web pages
  • Add a WLP Portlet to iGoogle - WLP portlets can be exposed as Google Gadgets
  • WebLogic Portal Playground - home of the WLP engineering labs, showing some online demos of WLP+Google Gadgets

In this blog I will demo WLP participating in a Mashup in a different way: it will be a data feed producer for a mashup. Specifically, I will show you how you can surface images from the WLP Content Respository as a JSON data feed. That data feed will in turn be combined in a Popfly mashup using the technique I covered in the previous blog entry.

This helps to show how WebLogic Portal can be the gateway from the enterprise into the consumer mashup space. WLP provides not only a UI framework for producing portlets (as in the iGoogle case), but it is also a virtualization layer for enterprise data services. The diagram below shows this idea. Notice that WLP provides virtualization capabilities for User Profile and Content Management. Once virtualized, WLP can produce profile and content REST services with ease.

mashupwithpopfly

Before I show you how to build it, take a quick look at the WLP+Popfly live demo hosted here. You will be prompted to download the Microsoft Silverlight browser plugin - you must accept to see the demo. Notice how the Photosphere is animating with a set of pictures? Those pictures are being retrieved from the WLP instance at http://wlp.bea.com. Note: the Photosphere Block is computationally expensive, so your CPU usage will spike.

Curious to know how I built it? Follow the steps below to build your own enterprise mashup with WebLogic Portal and Microsoft Popfly!

Step 1: Provisioning the WLP Content Repository

The first thing to do is provision the WLP Content Repository with images. In an enterprise, this will be done by content authors who are using Content Management to store the artifacts that they create on a daily basis. In my case, I loaded a number of pictures I took at the Smithsonian Air and Space Museum in Washington DC into the content repository on wlp.bea.com. I made sure that anonymous users are entitled to see the content, and that all images are in 'Published' status.

popfly_cmtools

Next, I modified the default image content type by adding a multivalued text property called "tag". Then, with each picture, I added a few tag words that describe the picture, like "plane", "propeller", "jet", "warplane", etc. This allows us to quickly query the images by keyword.

Step 2: Building a REST-style service for the WLP Content Repository

In the first blog post, I showed how to build a Popfly Data Block to consume a data service that returns JSON. We are going to use that same pattern in this mashup. To implement this, we need to deploy a REST service for WLP CM.

I turned to dev2dev CodeShare to quickly get my service up and running. There is a download available (that includes sample code for working with the WLP CM repository). I lifted the code from the Search sample to build my service. Also, Tejas Joshi coincidently just blogged about how to create a CM service just a few hours ago. My REST service does the following:

  • Queries the WLP CM system for all images
  • Optionally, the service accepts a tag to search for to scope the result set, like "plane"
  • The result set is composed as a JSON response, including the URL for each image
  • The client can then deserialize the JSON and extract the URLS for the images

The servlet I created for the service is implemented with a .JSP, not a .java file, to allow for easier distribution for others who want to use it. For a quick demo of the service, try the hosted service:

I won't post the code for the JSP here. But I will see about submitting it to CodeShare. (as of 2009, CodeShare is no longer available)

Step 3: Building the Popfly Data Block for Consuming the JSON Service

Now that we have our JSON service, we need the associated data block in Popfly. Since I have already covered how to build a JSON data block in the previous blog entry, I will just show the code and move on. The code snippets below show how I defined the JSON consumer block. I have shared my block on Popfly with the title Air and Space Museum Images, so you should see it in your Block palette.

Block Descriptor

<?xml version="1.0" encoding="utf-8"?>
<block class="AirAndSpaceMuseum">
<providerName>AirAndSpaceMuseum</providerName>
<providerUrl>
http://ajaxmashup.googlepages.com/
</providerUrl>
<providerLogoUrl>
http://wlp.bea.com/images/bea_logo.gif
</providerLogoUrl>
<blockIconUrl>
http://wlp.bea.com/images/bea_logo.gif
</blockIconUrl>
<operations>
<operation name="getImages">
<description>
Images from the Smithsonian Air and Space Museum,
hosted on BEA WebLogic Portal.
</description>
<inputs />
<outputs>
<output isArray="true" type="custom" object="Photo" />
</outputs>
</operation>
</operations>
<objects>
<object name="Photo">
<field name="url" type="imageUrl"
isArray="false" />
<field name="thumbnailUrl" type="thumbnailImageUrl"
isArray="false" />
<field name="id" type="id"
isArray="false" />
<field name="owner" type="userName"
isArray="false" />
<field name="title" type="title"
isArray="false" />
<field name="longitude" type="longitude"
isArray="false" />
<field name="latitude" type="latitude"
isArray="false" />
</object>
</objects>
</block>


Block Code Implementation


// create our namespace for the Block
function AirAndSpaceMuseum() { }

AirAndSpaceMuseum.prototype.getImages = function () {
// set the URL to our JSON service
// hosted in CM on wlp.bea.com
// tagged with the word 'plane' to scope it
url = "http://wlp.bea.com/dvt/"+
"api/content/images.jsp?tag=plane";

// get the JSON list of locations
var resultJSON = environment.getText(url);
var responseObject = eval("(" + resultJSON + ")");

// convert to the Array type we want
var resultsArray = new Array();
for(i=0;i < responseObject.images.image.length; i++) {
resultsArray[i] = new Photo(
responseObject.images.image[i].id,
"Peter Laird",
responseObject.images.image[i].image_name,
responseObject.images.image[i].url,
0, 0);
}
return resultsArray;
};

// Define the output payload, must match the XML
function Photo(id, ownerName, title, url, mediumUrl,
lon, lat)
{
this.id = id;
this.owner = ownerName;
this.title = title;
this.url = mediumUrl;
this.thumbnailUrl = url;
this.longitude = lon;
this.latitude = lat;

this.toString = function()
{
return "<table><tr><td><a href='" +
environment.escapeQuotes( this.url ) +
"' target='_blank'><img src='" +
environment.escapeQuotes( this.thumbnailUrl ) +
"' title='" +
environment.escapeQuotes( this.title ) +
", ID: " +
environment.escapeQuotes( this.id ) +
"'/></a></td><tr><td>" +
this.latitude + ", " + this.longitude +
"</td></tr></table>";
}
}


Step 4: Assembling the Mashup


As we saw in the previous blog entry, assembling the mashup is easily done. In this case, we connect the output of our Data Block to the input of the Photosphere Block. Without any coding, the Mashup is complete. Click the following link to see it in action:


WebLogic Portal + Popfly Mashup


This image shows the linkage of the mashup in the Popfly workspace:


popfly_airspacemashup


Taking a Step Back


Now that you have invested yourself in reading this tutorial, I will state without hesitation that this specific mashup has absolutely no value to the enterprise. Are your customers or employees really going to be entertained by images from your enterprise rotating in a Photosphere? Is it going to improve their productivity? Doubtful. To be a true mashup, shouldn't two services (like JSON+Flickr) be combined like in my previous blog? Probably.


So what was the point of building this mashup?!?


My intent was to show how easily it is to surface data from the enterprise into Popfly using WebLogic Portal. Mashups crave easily consumable data - which is exactly what WLP can provide. Finding a useful purpose for that data once it is in the Popfly environment is entirely up to you.


BEA WebLogic Portal + Microsoft Popfly = Enterprise Mashups


Happy mashing!


The simple CM REST service used above was submitted as a code sample here:


Simple CM REST CodeShare Project (as of 2009, CodeShare is no longer available)


Friday, June 1, 2007

Building a Data Driven Mashup with Microsoft Popfly

Regular readers of my blog know that I have been looking at Enterprise Mashups for a while now. Because I am an engineer on the WebLogic Portal product, I have focused on solutions involving that product. However, in this blog I will cover a new product called Popfly from Microsoft that takes an interesting approach to Mashups. I will walk you through how to build a Mashup in Popfly step by step, including the programming of a data service. The Mashup will display a slideshow that contains picture from Flickr of each of the US cities that dev2dev Tech Days visited.

NOTE: this blog entry was originally posted June 1st, 2007 on my previous blogging system (dev2dev.bea.com). Comments on the old blog were not transferred.

The World of Enterprise Mashups

A common question people ask is: "what's a Mashup?". That question is usually followed by another question: "why would I want one in my enterprise?" We are covering this topic in detail with a traveling road show called dev2dev Tech Days. The topic of the seminar is "Mashup the Enterprise", and we answer these questions. In the last few days, you have seen others blogging about that event on dev2dev such as James Bayer and Sean Boiling.

For those unable to attend the seminar, I can offer a few pointers to help get you started.

  • AP News - my favorite sample mashup from the web; it uses an AP News wire feed, Yahoo Geocoding, and Google Maps
  • dev2dev Tech Days 2007 - Mashup the Enterprise - register for a FREE seminar from BEA, available in 45 cities
  • Webinar: Enterprise Mashups with WebLogic Portal 9.2 - I presented an introduction to the Enterprise Mashup space
  • Building a Simple Ajax Powered Google Maps Mashup - a tutorial to build a simple Hello World mashup example
  • Picasa and Google Maps Mashup - James Bayer shows how to use Workshop to build a Picasa Mashup

BEA and Enterprise Mashups

Before we head into Microsoft land, I need to quickly cover how BEA is addressing the Mashup space. BEA offers several approaches to building a Mashup. The first approach is to use a portal product like WebLogic Portal or AquaLogic Portal. A second approach is a new product that will launch soon called AquaLogic Ensemble that specifically targets the Mashup space.

Enter Microsoft Popfly

Popfly is a new offering from Microsoft, currently just out the door as an Alpha release. The best way to get a feel for Popfly is to watch their 15 minute screencast here. Interesting eh? Let me summarize:

  • Popfly is a web based composition engine for assembling components into workable Mashups
  • The tooling intends to allow non-programmers to accomplish this
  • A Popfly Mashup is composed of "Blocks" which can either be data driven or presentation driven

It may seem odd for a BEA employee to cover a Microsoft product. But it all makes sense - Mashups are similar to Service Oriented Architectures (SOA) in that they demand interop between heterogeneous systems. While this particular blog entry will not show BEA WebLogic Portal integrating with Popfly, you should expect that I am heading in that direction. I have been showing how WLP portlets can be surfaced in iGoogle for nearly a year now, and customers have loved to see how WLP interops with other Mashups. Next, in a follow up blog I will show artifacts from WLP Content Management being surfaced in Popfly. Cool! But before we can show WLP+Popfly, I need to first introduce you to Popfly development which is what this blog entry is all about.

Your First Glimpse at a Popfly Mashup

To give you a better idea, see the iframe below which contains the completed demo that I will explain in this blog. I know it doesn't look like much, but I will show how this widget was assembled using 3 Popfly Blocks, including one that I built myself.

PJL revision:
Readers complained that just viewing my blog page required installing the Silverlight plugin because of the iframe. I am therefore just linking it here now. dev2dev Tech Days Popfly Mashup
/PJL revision:

Warning: the Flickr Block is presenting a random picture associated with each city. All apologies if a picture turns up that is not office-friendly. I just saw a picture of a guy in underwear. Yikes.

Here is what it is doing:

  • There already exists a hosted data feed (returning JSON) listing some of the locations that dev2dev Tech Days will visit this year
  • I built a Popfly Data Block that consumes that JSON feed, bringing the list of cities into my Popfly project
  • The dev2dev Data Block is wired into a pre-built Flickr Data Block, so that for each city, a single picture is retrieved using the city name as the image query
  • Finally, the Flickr Data Block is wired into a pre-built Slideshow Presentation Block to display the pictures
popfly_demo_endState

Starting with Popfly

Currently, Popfly is in a managed Alpha release. You must apply for a Popfly account and then wait. I applied last week and just got mine today, so perhaps it will go quickly for you.

Once you get your account, you will be able to start building Mashups. A developers kit is available for download once you have a login. There are a few hundred Blocks already available for your use, with more being added daily. You will also need to download a new browser plugin called Silverlight to use the toolset (you will be prompted). For this demo, you will also need to configure a Flickr API Key, available here.

Step 1: Creating the Data Service Block

As I mentioned previously, I assembled an Ajax powered Google Maps Mashup for my dev2dev article. The demo is hosted at http://ajaxmashup.googlepages.com, and includes a data feed that returns a list of dev2dev Tech Days cities. That data feed returns a format called JSON. If JSON is unfamiliar to you, I will add a link to my article that explains it as soon as it is posted.

To consume the JSON feed in Popfly, I first had to create a new Block project. A Block once again is a Mashup component that either works with data or generates presentation (a single Block can do both, but it shouldn't). My Block will retrieve the JSON, translate it into the appropriate Javascript object, and pass the object to the next Block. From what I have seen, Blocks are written in Javascript, although the intro screencast shows some interesting Visual Basic use cases.

Once a the Block project has been created, you must supply two files:

  • Block descriptor: an XML file that describes your block; this information is used to power the visual wireup capabilities
  • Javascript file: a single Javascript file that includes your Block implementation

The Block descriptor is self explanatory, and well documented. It enumerates the inputs and outputs of your Block so that a non-programmer can wireup the Block into a Mashup. Popfly defines a set of standard data types, including url, userName, title, etc. so that the tool can make intelligent default guesses on how to wire two Blocks together. The following is our Block descriptor. Notice how we have defined a single operation (method) on this Block: getLocations. This operation has no inputs, and its output is an array of Dev2DevLocation objects.

<?xml version="1.0" encoding="utf-8"?>
<block class="Dev2DevDays">
<providerName>Dev2DevDays</providerName>
<providerUrl>
http://ajaxmashup.googlepages.com/
</providerUrl>
<providerLogoUrl>
http://wlp.bea.com/images/bea_logo.gif
</providerLogoUrl>
<blockIconUrl>
http://wlp.bea.com/images/bea_logo.gif
</blockIconUrl>
<operations>
<operation name="getLocations">
<description>
Get the locations of BEA dev2dev Tech Days
2007, "Mashup the Enterprise".
</description>
<inputs />
<outputs>
<output isArray="true" type="custom"
object="Dev2DevLocation" />
</outputs>
</operation>
</operations>
<objects>
<object name="Dev2DevLocation">
<field name="city" type="city" isArray="false"/>
<field name="venue" type="name" isArray="false" />
<field name="address" type="location"
isArray="false"/>
<field name="date" type="date" isArray="false"/>
</object>
</objects>
</block>


The second piece of our Block is the implementation itself. I implemented this in Javascript, and it is quite simple. It is essentially a function call that marshals the JSON feed into an object array that can be used in Popfly.


// create our namespace for the Block
function Dev2DevDays() { }

Dev2DevDays.prototype.getLocations = function () {

// set the URL to our JSON service, hosted on googlepages.com
url = "http://ajaxmashup.googlepages.com/getD2DSites.html";

// get the JSON list of locations
var resultJSON = environment.getText(url);
var responseObject = eval("(" + resultJSON + ")");

// convert to the Array type we want
var resultsArray = new Array();
for(i=0;i < responseObject.locations.location.length; i++) {
resultsArray[i] = new Dev2DevLocation(
responseObject.locations.location[i].city,
responseObject.locations.location[i].location,
responseObject.locations.location[i].address,
responseObject.locations.location[i].date);
}
return resultsArray;
};

// Define the output payload, must match the XML descriptor
function Dev2DevLocation(city, venue, address, date)
{
this.city = city;
this.venue = venue;
this.address = address;
this.date = date;
}
Dev2DevLocation.prototype.toString = function(){
return this.venue+", "+this.address;
};


For those that have implemented Mashups in a browser, you are aware that browser security would normally restrict access to the googlepages.com JSON feed. The Single Origin Policy prevents browsers from crossing multiple network domains. Popfly provides a workaround: it includes a server side proxy accessible via the getText() or getXml() Javascript calls.


Wiring the dev2dev Block to the Flickr Block


The next step is to take the output of the dev2dev Data Block, which is an array of locations, and wire it into the Flickr Block. The Flickr block is provided out of the box by Popfly, so you do not need to build it. The Flickr block needs a query string to retrieve a photo. In this case, I wire that using the "city" field from the JSON feed. This can be done using the visual UI.


popfly_demo_wireup


Wiring the Flickr Block to the Slideshow Block


The last step is to take the output of the Flickr Data Block, which is an array of Photo objects, and wire it into the Slideshow Block. This can be done visually by just connecting the two blocks, as the default wireup will work just fine. Now the Mashup is done, how is easy is that!


Workaround for Popfly Alpha


OK, so for now it's not quite as easy as I said. I found I need one workaround to make this all hang together. The Flickr Block and Slideshow Block have a slight mismatch for their data contract because of the way I built the Mashup. Ordinarily, the Flickr Block is given a single string (city, in our case) to query on. But in our case, we are handing it a list of strings.


In this case, the Flickr Block will output an array of arrays - the outer array having a cell for each city, and the contents of each cell being an array of Photo objects. The Slideshow Block unfortunately expects a single dimension array of Photo objects. Therefore, the visual wireup will not succeed in building a working Mashup. Fortunately, there is a way to manually intervene in the wireup by editing the Javascript code for the wireup.


This is done by selecting the "Advanced Settings" when configuring the source Block, which is the Flickr Block in this case. In this case, the code needs to be altered to create a single concatenated array instead of a multi-dimensional array.


popfly_demo_advancedWireup


The code below is the replacement code to use, which was derived from the default code provided by Popfly. Note the addition of the concat() function to assemble one contiguous array. Also, the call to call_slideshow() has been taken out of the loop and is now called just once using the single array.


data["flickr"] = new Array();
for (var i=0; i<data["d2d Demo Block"].length; i++)
{
try
{
data["flickr"] = data["flickr"].concat(
flickr.getPhotos(data["d2d Demo Block"][i].city, 1));

}
catch (ex)
{
environment.reportErrorInLoop(i, ex);
}
}
call_slideshow();


Testing and Deploying the Mashup


Now that the Mashup is complete, it is a simple matter to put it to the test. By clicking on the Preview button, you can immediately deploy the Mashup and make sure it works.


After, you can navigate to the Project Manager and "Share" your dev2dev Block and Mashup. This allows other users to see your work.


Another Look at this Demo


I have recorded a cheesy movie that shows how the UI works for assembling this Mashup. I made the movie very late at night, so please excuse the tired voiceover. You will need to download the free FLV player to view them.


The Road Ahead


While cool, this demo may not have clear relevance to BEA customers. But hopefully you can see that we have established the basic working principles for building a data driven Mashup with Popfly. The next step: exposing enterprise data from a WebLogic Portal application into Popfly. Stay tuned!


Thursday, May 3, 2007

BEA dev2dev Tech Days 2007 Kick Off

Like a flashback to the 1933 movie classic, King Kong invaded New York City once again. This time King Kong was not a large ape, but the giant among developers that is Adam Fitzgerald, Director of dev2dev at BEA. He took center stage on the first of many performances of the dev2dev TechDays 2007 conference, coming soon to a city near you. I was a witness to this awe inspiring event, and I am here to report on what I saw.

kong.gif

The kick off sessions for dev2dev TechDays 2007 were held this week in Washington D.C and New York City. In both cities the room was packed for the half day seminar on the topic of Enterprise Mashups - confirming that there is a lot of interest in this space. With Adam Fitzgerald (aka Kong) as the primary presenter, I participated as well as Todd Ruhl from Adobe. Here is a recap of the action.

NOTE: this blog entry was originally posted May 3rd, 2007 on my previous blogging system (dev2dev.bea.com).

Just the Facts - the Agenda

dev2dev TechDays is a FREE half-day event explaining how the concept of a Mashup can be successfully applied to the enterprise. The agenda is as follows:

  • Defining and Explaining the Benefits of an Enterprise Mashup
  • Technologies and Buzzwords in the Mashup Space
  • BEA Mashup Enabled Products
  • Enterprise Mashups and Enterprise Portals
  • BEA Ensemble, the Next Word on Mashing up the Enterprise
  • BEA + Flex - a Killer Platform for Enterprise Mashups

Scaling the Empire State Building - the Demos

Always the daunting adventure that can cause vertigo, during the session we deliver a number of live demos. Fortunately, the demo gods looked favorably down upon us, and the demos went off mostly without a hitch.

The set of demos include:

Your Toolbox for Tackling Large Apes, and Enterprise Mashups

In addition to the demos, we discuss a variety of technologies you will need to understand to be successful in your Mashup implementation. Although we don't deep dive in any one technology, we look at code snippets and provide examples where we can.

  • Client Programming Stack #1: JavaScript, XmlHttpRequest, JSON/XML (aka Ajax)
  • Client Programming Stack #2: Adobe Flex
  • Microformats
  • REST APIs
  • RSS/ATOM
  • Google Gadgets and iGoogle

King Kong Captured on Film

To prove dev2dev TechDays is real and not imaginary, I was able to snap a few pictures of the event:

adam3_sml.jpg
King Kong captured on film, bewildering spectators.

todd2_sml.jpg
Todd Ruhl, defying the demo Gods with his Flex demo.


Technorati Tags: ,,,,

Tuesday, February 6, 2007

My Favorite Browser Based Development Tools for Internet Explorer

If you aren't using browser based development tools to help with your web application development, it is time to start. With Ajax enabled sites becoming common, View Source is no longer a reliable debugging approach. Also, when looking into issues like Cross Site Scripting (XSS), it is useful to have an embedded HTTP monitor. Firefox users seem to have universally adopted Firebug, but what about Internet Explorer? I personally use two IE tools, IE Developer Toolbar and IE HTTP Analyzer, and this blog explains why they are useful.

NOTE: this blog entry was originally posted February 7th, 2007 on my previous blogging system (dev2dev.bea.com).

My Toolbox

This blog discusses the browser based tools I use for troubleshooting and debugging in the web world. Every developer has their likes and dislikes when it comes to the tools they use. Discussions that compare and contrast different development tools like IDEs often degrade into religious tirades. I am not asserting that my toolbox is necessarily the best - it's simply what I use and what I like. Please add comments to this blog entry if you have found other tools useful. This blog will explain the capabilities that I use with these tools, but I will not cover all of the features.

Both of these tools are client side solutions, and install directly into Internet Explorer. I like the convenience of these features being one click away as I am working with a page. I personally use IE 7, but both of these tools work with IE 6 as well.

IE Developer Toolbar by Microsoft

The IE Developer Toolbar is a free download that snaps into your IE browser. By default, the tool pane is hidden from view. When you want to use the tool, you click on one of the options in the menu toolbar. This tool is great for debugging page content issues.

IE HTTP Analyzer by IEInspector Software LLC

The IE HTTP Analyzer is a modestly priced download that snaps into your IE browser. By default, the tool pane is hidden from view. When you want to use the tool, you click on the small icon to the right of your Page/Tools dropdown. This tool allows you to inspect all aspects of the HTTP protocol as your browser makes requests.

The rest of this blog will describe some use cases for which I have found these tools very helpful.

Use Case 1: Page Inspection - Viewing the Current DOM

Tool of Choice: IE Developer Toolbar

The View Source feature on browsers has no small place in the history of the web. How many people first learned HTML from a book? I, like most other developers, learned HTML using the View Source feature. The rapid expansion of the web back in the 90's was probably helped tremendously by this browser feature.

The View Source feature also used to be a great debugging tool while developing dynamic web projects. JSP not rendering correctly? View Source to the rescue. However, while View Source still has some use, it is no longer a reliable tool to help your development efforts.

Today's websites are far more interactive than the pages of just a few years ago. By way of DHTML and/or Ajax, the HTML that came back from the last page request may not be what the user is currently seeing. As you likely know, parts of the page DOM may get updated as you work within the page. View Source unfortunately is not tuned into this: it will only provide the HTML from the last page load.

Fortunately, the IE Developer Toolbar can help here. It has a View DOM capability that enables the developer to inspect the current state of the DOM for the page. When enabled, the tool will create a new window pane at the bottom of your browser that will show the DOM tree. For each node in the tree, you can inspect its style attributes and text children. As dynamic page capabilities change the DOM, the tree will be updated to reflect the changes. Also, a handy feature is the "Find by Click" capability. This enables you to navigate the tree by clicking anywhere on the page, and the DOM viewer tree will find the element you clicked on.

For example, WebLogic Portal 9.2 can make any portlet Ajax enabled. This prevents clicks within the portlet from causing page refreshes - it will update only the portlet instead. To capture the returned HTML from a portlet update, View Source will do no good. View DOM is the way to go.

Use Case 2: CSS Debug - Why is that text green?

Tool of Choice: IE Developer Toolbar

Cascading Style Sheets (CSS) allow for sophisticated page styles, but come at a price. At times it can be difficult to pinpoint why a style has been applied to an element on the page. Have you ever had trouble determining why a piece of text is a certain color? Or why the font is not what you expected?

WebLogic Portal has a sophisticated Look and Feel capability that allows developers to fine tune the appearance of a portal page. Styles can be associated with page tabs, portlet headers, portlet backgrounds, menus, and many other things. When I work on a Look and Feel, sometimes I need a little help to make things look right.

The tool that I find most useful is once again the IE Developer Toolbar. The DOM inspector allows me to click anywhere in the tree, and look at the applied styles. Then, I can walk the tree upwards until I discover which class the style is coming from. Because this is done in the browser on a rendered page, it is a very accurate and quick approach.

Use Case 3 - Monitoring Requests: Performance and Security Aids

Tool of Choice: IE HTTP Analyzer

Performance

While there are many useful server-side performance tools available, it is still helpful to have a client side tool. There are several scenarios that can be seen on the client:

  • Too many artifact requests - a single page may use hundreds of images/css/js files
  • Big artifacts - images/css files may be abnormally sized
  • Too many XmlHttpRequests - Ajax gone wild can overload the server

The IE HTTP Analyzer when enabled appears in a pane at the bottom of the browser. The top section of the tool shows the list of requests that the browser has issued. With each request, it shows the size in bytes of the response, the response time, and other attributes. With this feature, the above performance concerns can be quickly identified.

Security

Cross Site Scripting (XSS) testing has become an important part of the QA cycle when developing web applications. The typical behavior of a XSS attack is that it will send rogue requests to malicious systems from your browser. I recently wrote a blog entry about a specific XSS vulnerability with PDF files. While I was exploring that issue, it was useful to be able to see those rogue requests being emitted.

I found that the request monitoring feature of IE HTTP Analyzer to be useful in this case. It allowed me to easily see the problem, and validate that the solution that I implemented was sound. For security testers and for developers working on XSS issues, I think this tool is quite helpful.

Use Case 4: HTTP Headers - Viewing and Setting

Tool of Choice: IE HTTP Analyzer

Viewing

Request/response headers are a cornerstone of the HTTP protocol. Every request and response have them, and the information contained within is quite important. Cookies, caching, browser specific HTML, language detection - headers make these features possible. With any feature, sometimes things just don't work correctly.

IE HTTP Analyzer allows you to view the request and response headers for each request. This can be enormously useful when troubleshooting problems related to the headers. This week it helped me diagnose an issue with an incorrect mime type being returned for a resource.

Setting

There are cases when being able to view the headers is not enough. I recently did a blog post about implementing Single Sign On (SSO) with WebLogic Portal. The solution required a server side component to detect a special token in the request headers that contained the user identity. In a production environment, a proxy server would do the job of inserting the header. But while developing the solution, I wanted an easy way to test the implementation.

Once again, the IE HTTP Analyzer gave me a great solution. The tool provides an easy way to clone a request, and then muck with the request headers. In my case, I needed to clone a request to my WLP instance, and then add a test SSO token to the request header. The Request Builder can then rerun the request with the new header, providing a very easy way to test my implementation. See the image below on the tool in action - notice the new header I added (text selected).

Additional Resources

Browser Tools

Online Tools
These are convenient, but only work for testing internet accessible web servers.
Note: these are proxies hosted by 3rd parties, it probably isn't wise to login to your bank through them.

WebLogic Portal

Technorati Tags: ,,,